I've become really comfortable with Java 8's streams over the past couple years. As a result, when I go back and do Python work, I get stream envy. I looked around and found a couple options, but none of them were really what I'm after... something quick and dirty that will just make my syntax a bit more readable.
So I threw this together and find it quite handy. I hope you find it helpful as well. If you save this to a module and name it 'streams.py', you can use it like the following:
from lazy_streams import stream
S = stream(range(250)) \
.filter(lambda x: (x%2 == 0))
print S.size()
print S.take(10).to_string()
print S.reverse().take(10).to_list()
S1 = S.map(lambda x: "Item %d" % x)
print S1.first_or_else('Nothing to see')
print stream(['Patty Cake', 'Jim Shoe', 'Justin Case']) \
.sort(lambda x: x.split(' ')[1]) \
.to_list()
print stream([[1, 2], 3, [4, 5, 6], 'seven']) \
.flatten() \
.to_list()
I've tested it on lists as big as 2.5 million items and the lazy evaluation seems to work really great!
Here's the gist:
Showing posts with label python. Show all posts
Showing posts with label python. Show all posts
Thursday, February 23, 2017
Friday, February 17, 2017
Sharing a Python generator across multiple multiprocessing processes.
Sometimes I need to do some work on a seemingly endless set of data. I often use generators to create the endless data. Say, for example I were trying to brute-force crack a zip file's password. I'd create a generator that methodically and continually creates new passwords for the cracking to to use in attempting to unzip the file.
Once I have my generator in place, I have a problem. What if I want to spread this brute-force attack across all the cores in my system to speed up this slow endless effort. One would think that multiprocessing will solve the problem.
Well, no. Generators aren't natively shared across processes in Python. They're copied to each process. This means that if you try to use the generator with multiprocessing, each process will get it's own copy of the generator and each process would get the same values from each copy.
To solve that, I devised a quick and dirty solution: Place the generator in it's own process and then have each worker process request the next value from it via inter-process communication using the multi-processing Pipe class.
To that end, here's an example. I post this here mainly to jog my memory next time I need to do this, but if you find it useful, great!
Wednesday, February 8, 2017
Non-freeze, single file distribution of your python project
In my job, I often have to share/distribute Python code to others on my development team or to others in sibling development teams. These folks are technical and I can easily rely on them to have a reasonably contemporary version of Python already installed. Thus I don't really want to completely freeze my Python project (via cxFreeze, py2app, py2exe, etc.). Nor do I want to send my coworkers through the 'create a virtualenv, pip install -r, etc.).
I want a middle-ground. I want to just send them a file, knowing that it contains all the required dependencies and will just run, assuming they have Python in their path.
I've known for a while that if you zip up a directory full of Python files and so long as the root of the zip file contains a __main__.py file and you can directly run the zip file via python {filename.zip}.
What I didn't know is that you can concatenate a text file containing the Python shebang ('#!/usr/bin/env python') and a python zip file and the resulting file is runnable.
#!/usr/bin/env python
PK^C^D^T^@^B^@^H^@nLHJb±gL<94>^A^@^@Ò^B^@^@^K^@^\^@__main__.pyUT ^@^C¯,<9b>Xö,<9b>Xux^K^@^A^D«<82><90>~^D^T^@^@^@u<92>ÑkÛ0^PÆßýWܲ^GÙÐ$},^EÃÂ(<85>2Ú<90>ìq ^Tûâ<88>Z<92>9<9d>º<95>±ÿ}';ÎJ`Â^O<96>ôéû~ºÓ
ÈY©1^F<93>9£4@^Q&<81>+ü<8e>O^X<88>2#tCrÌ^N0©¸<83>ÛÑw°ÌÕÂ#®Ë¾^AaÀ^PÅ >«¼h@^P;c6<8d>"^Âý=^\AB!ej<91> <9e>g¦ñ<95>Vgé<87>ÌqÏ^RC<8a>9<99>aq^O^O<9f>Cv^U^AþXQi<88>ÛÌ®°Üx<90>µó<98>^Gl ´Z^B<81>^E·¾&^B^C<83>ÕÚ§
,g^LÃ=kW^Y$râ Æ]HÉ^UÝ5AÂ[V^FC$y<80>¢a<82>y^V^U{°(Ô<9b>|Ü^XW}¤h<8f>aØ}¦^G>o<96>êu<9c>e?k<8e>,àbºÔ/ýëh´¶^LÇp^A^Ye<8b>LÕBt<85>w£hi¿&(^HÛîä<96>tÿ.^@A>
dJuëX
I stumbled upon a tool called pex which will automate generating these shebang/zip files. While I found pex useful, it seems too much for my needs. So I started cobbling together my own shebang/zip files by hand as I needed them.
Ultimately, wanted to automate this some, so I ended up creating a simple bash script (which I named 'compile.sh') to speed things up. Here's that script. Hope you find this useful.
#!/bin/bash
#
# compile.sh
# Creates a self-runnable, single-file deployable for your python project.
# Your python project's main entry point must be in a file named __main__.py.
# It will embed in the deployable every dependency you've pip-installed in
# your virtualenv .env directory.
#
# The deployable still requires that python is installed on the target system.
if [[ ! -d .env/lib/python2.7/site-packages ]]; then
echo "This script must be run from a virtualenv root."
exit 1
fi
if [[ ! -f __main__.py ]]; then
echo "This will only work if you have a __main__.py file."
exit 1
fi
if [[ -z "$1" ]]; then
echo "Usage: $(basename $0) {output_filename}"
exit 1
fi
TMPDIR="$(mktemp -u /tmp/python.compile.XXXXXXX)"
CURDIR="$(pwd)"
TARGET="$1"
# Create payload zip with our code (remove extra junk)
mkdir -p "$TMPDIR/deps"
zip -9 "$TMPDIR/payload.zip" *
zip -d "$TMPDIR/payload.zip" compile.sh
zip -d "$TMPDIR/payload.zip" requirements.txt
zip -d "$TMPDIR/payload.zip" "$TARGET" > /dev/null
# Gather the virtualenv packages and clean them up
cp -R .env/lib/python2.7/site-packages/* "$TMPDIR/deps"
find "$TMPDIR/deps" -iname '*.pyc' -delete
find "$TMPDIR/deps" -ipath '*pip*' -delete
find "$TMPDIR/deps" -ipath '*easy_install*' -delete
find "$TMPDIR/deps" -ipath '*dist-info*' -delete
# Add the virtualenv packages to the payload
cd "$TMPDIR/deps"
zip -9 -r ../payload.zip *
cd "$CURDIR"
# Assemble the payload into a runable
echo '#!/usr/bin/env python' | cat - "$TMPDIR/payload.zip" > "$TARGET"
chmod +x "$TARGET"
# Cleanup
rm -r "$TMPDIR"
Wednesday, October 7, 2015
Python Decorators Examples
I often go long stretches between times when I aggressively use python at clients. As a result, I get rusty on what I could consider somewhat advanced topics and have to spend time googling around to jog my memory. Reading my own code usually gets me back up and running quicker than reading others' code. Leaving this here as a breadcrumb to help me remember how to use python decorators.
If you find this helpful, awesome!
#!/usr/bin/env python
"""Decorator examples"""
def decorator_without_arguments(func):
def wrapped_function(*args, **kwargs):
"""Reverses the arguments before calling"""
new_args = reversed(args)
return func(*new_args, **kwargs)
wrapped_function.__name__ = "(%s -> %s)" % \
(decorator_without_arguments.__name__, func.__name__)
return wrapped_function
def decorator_with_arguments(arg1, arg2=None):
def actual_decorator(func):
def wrapped_function(*args, **kwargs):
"""Wraps results in explanation string"""
result = "(%s: %s) " % (arg1, ', '.join([str(x) for x in args]))
result += str(func(*args, **kwargs))
if arg2 is not None:
result += arg2
return result
wrapped_function.__name__ = func.__name__
return wrapped_function
return actual_decorator
def undecorated_subtract(number_1, number_2):
return number_1 - number_2
@decorator_without_arguments
def decorated_subtract(number_1, number_2):
return number_1 - number_2
def undecorated_add(number_1, number_2):
return number_1 + number_2
@decorator_with_arguments('ADD')
def decorated_add(number_1, number_2):
return number_1 + number_2
if __name__ == '__main__':
print undecorated_subtract(7, 3)
print decorated_subtract(7, 3)
print decorated_subtract
print undecorated_add(3, 7)
print decorated_add(3, 7)
print decorated_add
Wednesday, June 6, 2012
Patching tip using mocks in python unit tests
I use the mock library by Michael Foord in my python unit tests and one problem always plagued me. Here's the problem and the solution.
Other times, I use this pattern (let's call it pattern B):
Sometimes when I import a package/module in my code I use this pattern (let's call it pattern A):
"""file_module_pattern_a.py"""
import os
def get_files(path):
"""Return list of files"""
return os.listdir(path)
Other times, I use this pattern (let's call it pattern B):
"""file_module_pattern_b.py"""
from os import listdir
def get_files(path):
"""Return list of files"""
return listdir(path_variable)
Note the differente. In pattern A, I import the whole os package, while in pattern B, I only import the listdir function. Now in my unit tests, here's what I use for pattern A:
"""Unit tests for module file_module_pattern_a"""
from file_module_pattern_a import get_files
from unittest import TestCase
from mock import patch, sentinel
class StandloneTests(TestCase):
"""Test the standalone functions"""
@patch('os.listdir')
def test_get_files(self, mock_listdir):
"""Test the get_files function"""
test_result = get_files(sentinel.PATH)
mock_listdir.assert_called_once_with(sentinel.PATH)
self.assertEqual(test_result, mock_listdir.return_value)
This works great. The only problem is... if I use pattern B with this unit test, the mock_listdir never gets called. The unit test tries to use the REAL os.listdir function.
Here's the issue at hand. When I use pattern B, I'm actually adding the function to my module, not the global scope. As a result, the patch directive needs to reference my module, not os. Here's the correct unit test patch syntax:
"""Unit tests for module file_module_pattern_b"""
from file_module_pattern_b import get_files
from unittest import TestCase
from mock import patch, sentinel
class StandloneTests(TestCase):
"""Test the standalone functions"""
@patch('file_module_pattern_b.listdir')
def test_get_files(self, mock_listdir):
"""Test the get_files function"""
test_result = get_files(sentinel.PATH)
mock_listdir.assert_called_once_with(sentinel.PATH)
self.assertEqual(test_result, mock_listdir.return_value)
Wednesday, May 30, 2012
Run multiple python versions on your system
I'm a software development consultant. I write python (as well as other languages) code for many clients and I don't get to dictate what their environment looks like. I've got clients running python as old as 2.4 while others are on the bleeding edge. Additionally, each client may have their own packages installed as well as differing lists of third party packages.
This post is a description of how I went about getting multiple versions of python installed in my ubuntu development machine and how I go about managing different package sets for different clients.
To install it (per the instructions in the link above), you do the following:
steve@ubuntu64 ~ $ sudo add-apt-repository ppa:fkrull/deadsnakes
Then you need to update your cache:
steve@ubuntu64 ~ $ sudo apt-get update
Finally, simply install the other versions (I'm running on ubuntu 12.04 LTS, so I have python 2.7 already):
steve@ubuntu64 ~ $ sudo apt-get install python2.4 python2.5 python2.6
If you're following along, we now have python versions 2.4 through 2.7 installed the computer. If you run 'python', you'll see the default version is still 2.7.
steve@ubuntu64 ~ $ python
Python 2.7.3 (default, Apr 20 2012, 22:39:59)
[GCC 4.6.3] on linux2
Type "help", "copyright", "credits" or "license" for more information.
>>>
Here's why: Each python version is stored in /usr/bin as python2.X where X is the version. There is a symbolic link named python that points to the version you want to be the default. Instead of typing python from the bash prompt, you could just as easily type python2.5:
steve@ubuntu64 ~ $ ls -l /usr/bin/python*
lrwxrwxrwx 1 root root 9 Apr 17 13:20 /usr/bin/python -> python2.7
lrwxrwxrwx 1 root root 9 Apr 17 13:20 /usr/bin/python2 -> python2.7
-rwxr-xr-x 1 root root 1216520 May 21 12:13 /usr/bin/python2.4
-rwxr-xr-x 1 root root 1403624 May 3 00:17 /usr/bin/python2.5
-rwxr-xr-x 1 root root 2652056 May 12 08:43 /usr/bin/python2.6
-rwxr-xr-x 1 root root 2993560 Apr 20 19:37 /usr/bin/python2.7
steve@ubuntu64 ~ $ python2.5
Python 2.5.6 (r256:88840, May 3 2012, 04:16:14)
[GCC 4.6.3] on linux2
Type "help", "copyright", "credits" or "license" for more information.
>>>
This is a point of interest. I would not mess with the symbolic link. Ubuntu runs python for many internal maintenance scripts and those scripts are expecting the python version that shipped with ubuntu.
That's where virtualenv comes in. If your a ruby programmer, this is analogous to rvm. Virtualenv lets you manage the python versions and package installations separately for different projects or clients.
steve@ubuntu64 ~ $ sudo apt-get install python-virtualenv
That it. Virtualenv is ready to go now.
First, let's create a directory for the project:
steve@ubuntu64 ~ $ mkdir -p ~/dev/project1
steve@ubuntu64 ~ $ cd ~/dev/project1
Next, run virtualenv to create the environment for the project:
steve@ubuntu64 ~/dev/project1 $ virtualenv -p /usr/bin/python2.5 .env
Running virtualenv with interpreter /usr/bin/python2.5
New python executable in .env/bin/python2.5
Also creating executable in .env/bin/python
Installing distribute.............................................................................................................................................................................................done.
Installing pip...............done.
steve@ubuntu64 ~/dev/project1 $
This command tells virtualenv to create a .env directory and to place a copy of the 2.5 version of python in it. This copy of the 2.5 python is brand-spankin' new. It doesn't have any packages (beyond the standard library) installed. You will need to install them yourself. Any packages that you install in this instance of python will not be available to main python installation or other virtualenv instances.
Before your can use this new copy, you need to activate it:
steve@ubuntu64 ~/dev/project1 $ source .env/bin/activate
(.env)steve@ubuntu64 ~/dev/project1 $
The activate script manipulates your path environment variable, placing the new python instance first in your path. This makes is so that when you run python, it will use the version from your instance:
(.env)steve@ubuntu64 ~/dev/project1 $ which python
/home/steve/dev/project1/.env/bin/python
(.env)steve@ubuntu64 ~/dev/project1 $ python
Python 2.5.6 (r256:88840, May 3 2012, 04:16:14)
[GCC 4.6.3] on linux2
Type "help", "copyright", "credits" or "license" for more information.
>>>
Also, notice that your prompt starts with (.env). This tells you that you're running with the virtualenv instance activated. To install packages in your instance, use the pip command:
(.env)steve@ubuntu64 ~/dev/project1 $ pip install mock nose coverage
Downloading/unpacking mock
Downloading mock-0.8.0.tar.gz (749Kb): 749Kb downloaded
Running setup.py egg_info for package mock
warning: no files found matching '*.png' under directory 'docs'
warning: no files found matching '*.css' under directory 'docs'
warning: no files found matching '*.html' under directory 'docs'
warning: no files found matching '*.js' under directory 'docs'
Downloading/unpacking nose
Downloading nose-1.1.2.tar.gz (729Kb): 729Kb downloaded
In the tar file /tmp/pip-dH_WYa-unpack/nose-1.1.2.tar.gz the member nose-1.1.2/doc/doc_tests/test_selector_plugin/support/tests/mymodule/my_function$py.class is invalid: 'filename None not found'
In the tar file /tmp/pip-dH_WYa-unpack/nose-1.1.2.tar.gz the member nose-1.1.2/doc/doc_tests/test_restricted_plugin_options/restricted_plugin_options.rst.py3.patch is invalid: 'filename None not found'
Running setup.py egg_info for package nose
Downloading/unpacking coverage Downloading coverage-3.5.2.tar.gz (115Kb): 115Kb downloaded
Running setup.py egg_info for package coverage
no previously-included directories found matching 'test'Installing collected packages: mock, nose, coverage
Running setup.py install for mock
warning: no files found matching '*.png' under directory 'docs'
warning: no files found matching '*.css' under directory 'docs'
warning: no files found matching '*.html' under directory 'docs'
warning: no files found matching '*.js' under directory 'docs'
Running setup.py install for nose
Installing nosetests script to /home/steve/dev/project1/.env/bin
Installing nosetests-2.5 script to /home/steve/dev/project1/.env/bin
Running setup.py install for coverage
building 'coverage.tracer' extension
gcc -pthread -fno-strict-aliasing -DNDEBUG -g -fwrapv -O2 -Wall -Wstrict-prototypes -fPIC -I/usr/include/python2.5 -c coverage/tracer.c -o build/temp.linux-x86_64-2.5/coverage/tracer.o
coverage/tracer.c:3:20: fatal error: Python.h: No such file or directory
compilation terminated.
**
** Couldn't install with extension module, trying without it...
** SystemExit: error: command 'gcc' failed with exit status 1
**
no previously-included directories found matching 'test'
Installing coverage script to /home/steve/dev/project1/.env/bin
Successfully installed mock nose coverage
Cleaning up...
(.env)steve@ubuntu64 ~/dev/project1 $
To see that the packages have been installed, simply use them:
(.env)steve@ubuntu64 ~/dev/project1 $ python
Python 2.5.6 (r256:88840, May 3 2012, 04:16:14)
[GCC 4.6.3] on linux2
Type "help", "copyright", "credits" or "license" for more information.
>>> import mock
>>> import nose
>>> import coverage
>>>
When you're done working on the project, deactivate it. You can always come back later and activate it again.
(.env)steve@ubuntu64 ~/dev/project1 $ deactivate
steve@ubuntu64 ~/dev/project1 $
Notice that when you deactivate the environment, your packages are no longer available:
steve@ubuntu64 ~/dev/project1 $ python
Python 2.7.3 (default, Apr 20 2012, 22:39:59)
[GCC 4.6.3] on linux2
Type "help", "copyright", "credits" or "license" for more information.
>>> import mock
Traceback (most recent call last):
File "<stdin>", line 1, in <module>
ImportError: No module named mock
>>> import nose
Traceback (most recent call last):
File "<stdin>", line 1, in <module>
ImportError: No module named nose
>>> import coverage
Traceback (most recent call last):
File "<stdin>", line 1, in <module>
ImportError: No module named coverage
>>>
You can create as many virtualenv environments as you like. I create one for each project that I work on.
To make life even easier, here's a couple additional things I do that you might find helpful!
First, once you've started to use virtualenv with some frequency, you start to get tired of downloading and installing the same packages over and over. Pip has the ability to cache your downloaded packages for reuse. To do that, you'll need to create a directory to store the download packages in:
steve@ubuntu64 ~ $ mkdir ~/.pip_download_cache
Then you'll need to set a variable to inform pip of the new directory. Add the following to your .bashrc file:
export PIP_DOWNLOAD_CACHE=/home/steve/.pip_download_cache
Now when you do a pip install, it will keep the downloaded files in the ~/.pip_download_cache directory. The next time you do a pip install of the same package, it will just use the copy from the directory instead of downloading it again.
Second, it can be tedious to always have to type 'source .env/bin/activate' every time you want to activate an environment. Since I always put my virtual environments in a .env directory I can count on the command to activate always being the same. So I create an alias for it. I added the the following to my ~/.bash_aliases file:
alias activate='source .env/bin/activate'
Now once I cd into the projects directory, I simply type activate to activate my virtual environment.
This post is a description of how I went about getting multiple versions of python installed in my ubuntu development machine and how I go about managing different package sets for different clients.
Get multiple pythons installed
Ubuntu typically only supports one python 2.x version and one 3.x version at a time. There's a popular ppa (personal package archive) called deadsnakes that contains older versions of python. You can find it:To install it (per the instructions in the link above), you do the following:
steve@ubuntu64 ~ $ sudo add-apt-repository ppa:fkrull/deadsnakes
Then you need to update your cache:
steve@ubuntu64 ~ $ sudo apt-get update
Finally, simply install the other versions (I'm running on ubuntu 12.04 LTS, so I have python 2.7 already):
steve@ubuntu64 ~ $ sudo apt-get install python2.4 python2.5 python2.6
If you're following along, we now have python versions 2.4 through 2.7 installed the computer. If you run 'python', you'll see the default version is still 2.7.
steve@ubuntu64 ~ $ python
Python 2.7.3 (default, Apr 20 2012, 22:39:59)
[GCC 4.6.3] on linux2
Type "help", "copyright", "credits" or "license" for more information.
>>>
Here's why: Each python version is stored in /usr/bin as python2.X where X is the version. There is a symbolic link named python that points to the version you want to be the default. Instead of typing python from the bash prompt, you could just as easily type python2.5:
steve@ubuntu64 ~ $ ls -l /usr/bin/python*
lrwxrwxrwx 1 root root 9 Apr 17 13:20 /usr/bin/python -> python2.7
lrwxrwxrwx 1 root root 9 Apr 17 13:20 /usr/bin/python2 -> python2.7
-rwxr-xr-x 1 root root 1216520 May 21 12:13 /usr/bin/python2.4
-rwxr-xr-x 1 root root 1403624 May 3 00:17 /usr/bin/python2.5
-rwxr-xr-x 1 root root 2652056 May 12 08:43 /usr/bin/python2.6
-rwxr-xr-x 1 root root 2993560 Apr 20 19:37 /usr/bin/python2.7
steve@ubuntu64 ~ $ python2.5
Python 2.5.6 (r256:88840, May 3 2012, 04:16:14)
[GCC 4.6.3] on linux2
Type "help", "copyright", "credits" or "license" for more information.
>>>
This is a point of interest. I would not mess with the symbolic link. Ubuntu runs python for many internal maintenance scripts and those scripts are expecting the python version that shipped with ubuntu.
Use virtualenv to manage your python installations and package sets
So now that you have multiple versions of python on your system, how to manage them? How do you keep packages installed for one version separate from packages installed for another. What if you want to run one version of django for client X and a different version for client Y?That's where virtualenv comes in. If your a ruby programmer, this is analogous to rvm. Virtualenv lets you manage the python versions and package installations separately for different projects or clients.
Installing virtualenv is simple
As always, you're just a single apt-get command away from having virtualenv ready to go:steve@ubuntu64 ~ $ sudo apt-get install python-virtualenv
That it. Virtualenv is ready to go now.
Quick example
Say your starting a new project for a client. They are running python2.5 and want to use the mocks, nose and coverage packages for testing. Here a walkthrough of how to use virtualenv to manage the project.First, let's create a directory for the project:
steve@ubuntu64 ~ $ mkdir -p ~/dev/project1
steve@ubuntu64 ~ $ cd ~/dev/project1
Next, run virtualenv to create the environment for the project:
steve@ubuntu64 ~/dev/project1 $ virtualenv -p /usr/bin/python2.5 .env
Running virtualenv with interpreter /usr/bin/python2.5
New python executable in .env/bin/python2.5
Also creating executable in .env/bin/python
Installing distribute.............................................................................................................................................................................................done.
Installing pip...............done.
steve@ubuntu64 ~/dev/project1 $
This command tells virtualenv to create a .env directory and to place a copy of the 2.5 version of python in it. This copy of the 2.5 python is brand-spankin' new. It doesn't have any packages (beyond the standard library) installed. You will need to install them yourself. Any packages that you install in this instance of python will not be available to main python installation or other virtualenv instances.
Before your can use this new copy, you need to activate it:
steve@ubuntu64 ~/dev/project1 $ source .env/bin/activate
(.env)steve@ubuntu64 ~/dev/project1 $
The activate script manipulates your path environment variable, placing the new python instance first in your path. This makes is so that when you run python, it will use the version from your instance:
(.env)steve@ubuntu64 ~/dev/project1 $ which python
/home/steve/dev/project1/.env/bin/python
(.env)steve@ubuntu64 ~/dev/project1 $ python
Python 2.5.6 (r256:88840, May 3 2012, 04:16:14)
[GCC 4.6.3] on linux2
Type "help", "copyright", "credits" or "license" for more information.
>>>
Also, notice that your prompt starts with (.env). This tells you that you're running with the virtualenv instance activated. To install packages in your instance, use the pip command:
(.env)steve@ubuntu64 ~/dev/project1 $ pip install mock nose coverage
Downloading/unpacking mock
Downloading mock-0.8.0.tar.gz (749Kb): 749Kb downloaded
Running setup.py egg_info for package mock
warning: no files found matching '*.png' under directory 'docs'
warning: no files found matching '*.css' under directory 'docs'
warning: no files found matching '*.html' under directory 'docs'
warning: no files found matching '*.js' under directory 'docs'
Downloading/unpacking nose
Downloading nose-1.1.2.tar.gz (729Kb): 729Kb downloaded
In the tar file /tmp/pip-dH_WYa-unpack/nose-1.1.2.tar.gz the member nose-1.1.2/doc/doc_tests/test_selector_plugin/support/tests/mymodule/my_function$py.class is invalid: 'filename None not found'
In the tar file /tmp/pip-dH_WYa-unpack/nose-1.1.2.tar.gz the member nose-1.1.2/doc/doc_tests/test_restricted_plugin_options/restricted_plugin_options.rst.py3.patch is invalid: 'filename None not found'
Running setup.py egg_info for package nose
Downloading/unpacking coverage Downloading coverage-3.5.2.tar.gz (115Kb): 115Kb downloaded
Running setup.py egg_info for package coverage
no previously-included directories found matching 'test'Installing collected packages: mock, nose, coverage
Running setup.py install for mock
warning: no files found matching '*.png' under directory 'docs'
warning: no files found matching '*.css' under directory 'docs'
warning: no files found matching '*.html' under directory 'docs'
warning: no files found matching '*.js' under directory 'docs'
Running setup.py install for nose
Installing nosetests script to /home/steve/dev/project1/.env/bin
Installing nosetests-2.5 script to /home/steve/dev/project1/.env/bin
Running setup.py install for coverage
building 'coverage.tracer' extension
gcc -pthread -fno-strict-aliasing -DNDEBUG -g -fwrapv -O2 -Wall -Wstrict-prototypes -fPIC -I/usr/include/python2.5 -c coverage/tracer.c -o build/temp.linux-x86_64-2.5/coverage/tracer.o
coverage/tracer.c:3:20: fatal error: Python.h: No such file or directory
compilation terminated.
**
** Couldn't install with extension module, trying without it...
** SystemExit: error: command 'gcc' failed with exit status 1
**
no previously-included directories found matching 'test'
Installing coverage script to /home/steve/dev/project1/.env/bin
Successfully installed mock nose coverage
Cleaning up...
(.env)steve@ubuntu64 ~/dev/project1 $
To see that the packages have been installed, simply use them:
(.env)steve@ubuntu64 ~/dev/project1 $ python
Python 2.5.6 (r256:88840, May 3 2012, 04:16:14)
[GCC 4.6.3] on linux2
Type "help", "copyright", "credits" or "license" for more information.
>>> import mock
>>> import nose
>>> import coverage
>>>
When you're done working on the project, deactivate it. You can always come back later and activate it again.
(.env)steve@ubuntu64 ~/dev/project1 $ deactivate
steve@ubuntu64 ~/dev/project1 $
Notice that when you deactivate the environment, your packages are no longer available:
steve@ubuntu64 ~/dev/project1 $ python
Python 2.7.3 (default, Apr 20 2012, 22:39:59)
[GCC 4.6.3] on linux2
Type "help", "copyright", "credits" or "license" for more information.
>>> import mock
Traceback (most recent call last):
File "<stdin>", line 1, in <module>
ImportError: No module named mock
>>> import nose
Traceback (most recent call last):
File "<stdin>", line 1, in <module>
ImportError: No module named nose
>>> import coverage
Traceback (most recent call last):
File "<stdin>", line 1, in <module>
ImportError: No module named coverage
>>>
You can create as many virtualenv environments as you like. I create one for each project that I work on.
Bonus material
To make life even easier, here's a couple additional things I do that you might find helpful!
First, once you've started to use virtualenv with some frequency, you start to get tired of downloading and installing the same packages over and over. Pip has the ability to cache your downloaded packages for reuse. To do that, you'll need to create a directory to store the download packages in:
steve@ubuntu64 ~ $ mkdir ~/.pip_download_cache
Then you'll need to set a variable to inform pip of the new directory. Add the following to your .bashrc file:
export PIP_DOWNLOAD_CACHE=/home/steve/.pip_download_cache
Now when you do a pip install, it will keep the downloaded files in the ~/.pip_download_cache directory. The next time you do a pip install of the same package, it will just use the copy from the directory instead of downloading it again.
Second, it can be tedious to always have to type 'source .env/bin/activate' every time you want to activate an environment. Since I always put my virtual environments in a .env directory I can count on the command to activate always being the same. So I create an alias for it. I added the the following to my ~/.bash_aliases file:
alias activate='source .env/bin/activate'
Now once I cd into the projects directory, I simply type activate to activate my virtual environment.
Friday, April 27, 2012
Automated python unit testing, code coverage and code quality analysis with Jenkins - part 3
This is the third and final posting in a series. Check here for the first posting and here for the second posting.
In this posting I will be explaining how to automate the unit testing, code coverage and code quality analysis that we did manually in the first two posts.
As the title of this series suggests, I use Jenkins for this automation (also known as continuous integration - ci). In keeping with the theme of using apt for everything, I will install Jenkins via apt. That being said, in my real job, I have downloaded a jenkins.war file from the Jenkins web site and I start it up from the command line.
Here's a quick screen-shot of the instructions you'll need to follow:

Once you've got Jenkins installed, check to see if Jenkins is running. If it isn't start it.
sudo /etc/init.d/jenkins status
sudo /etc/init.d/jenkins start

Once Jenkins is up and running, let's pull it up in a browser. It will be listening on port 8080.


This will show you a list of all the available plugins that Jenkins can use. Find and select (check the checkbox) for the following plugins:
Jenkins will install the selected plugins and then take a moment to restart. After Jenkins restarts we need to make a small configuration change in order for git to work properly. When Jenkins is done restarting, click the Manage Jenkins link from the left-hand list of links. The click Configure System from the resulting page. This will bring up a global Jenkins configuration page. Scroll down (past the Git section) to the Git Plugin section. Enter values in the Global Config user.name Value and Global Config user.email Value fields. Finally, click the Save button at the bottom of the page.


This will bring you to the Configure page for your new job. This is where you tell Jenkins WHAT, WHEN and HOW to do. Let's get started!


BTW, for larger Jenkins implementations (more than 10 or so Jenkins jobs), the Poll SCM option is a terrible idea. I can show you another way using git hooks if there is interest. For now, though, let's just use the Poll SCM option since this is just an example project.
Let's review what's going on here. When the Jenkins job detects that a source code change has occurred in the git repository, it will clone a copy of the repository and then run the above script against the clone.
You'll notice that the nosetests command has become a little more complex. I've added a fair number of command-line arguments to it. This is to make sure that the code coverage runs over all the code, not just the code that's involved in the unit tests. It also ensures that nosetests write's it's output to a file that Jenkins can interpret.
When nosetests runs the code coverage, it generates a .coverage file. Jenkins can't read that. The third line of the script (python -m coverage xml...) converts the .coverage file to an xml format that Jenkins Cobertura plugin can read.
The last line (pylint...) runs pylint on the project and outputs it in a format that the Violations Jenkins plugin can read. I also have it disabling a couple warnings that I don't care to know about. (You can customize this all you want BTW).

First stop is coverage. In the Post-build Actions section click the Public Cobertura Coverage Report checkbox. Then in the Cobertura xml report pattern field, enter coverage.xml.

This tells Jenkins to read a file named coverage.xml that will contain testing code coverage information in it. The line listed below (from the build script in step 3) is what creates this file:
python -m coverage xml --include=project1*
Next, click the Publish JUnit test result report checkbox and enter nosetests.xml in the Test report XMLs field.

This instructs Jenkins to interpret the a file named nosetests.xml that the nose command from creates:
nosetests --with-xunit --all-modules --traverse-namespace --with-coverage --cover-package=project1 --cover-inclusive
Finally, check the Report Violations checkbox and enter **/pylint.out in the pylint field.

This instructs Jenkins to interpret the pylint.out file that is generated by the pylint command from the build script:
pylint -f parseable -d I0011,R0801 project1 | tee pylint.out
At this point, you're done configuring the job. Click the Save button. Now you're ready to give it a go!
 Not very interesting, is it? That's because we currently have 100% coverage and no test failures! Let's add some code (without tests) and see what happens.
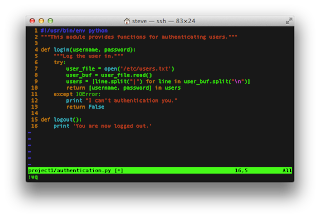
def logout():
print 'You are now logged out.'


In this posting I will be explaining how to automate the unit testing, code coverage and code quality analysis that we did manually in the first two posts.
As the title of this series suggests, I use Jenkins for this automation (also known as continuous integration - ci). In keeping with the theme of using apt for everything, I will install Jenkins via apt. That being said, in my real job, I have downloaded a jenkins.war file from the Jenkins web site and I start it up from the command line.
Install and start Jenkins
Jenkins appears in the default apt that ships with Ubuntu, but it's a really old version... so old, in fact, that it won't run the plugins that we'll need in order to do the code quality and code coverage analysis. To get around this, refer to these instructions on the Jenkins web site to update your apt sources and get the latest version Jenkins via apt.Here's a quick screen-shot of the instructions you'll need to follow:

Once you've got Jenkins installed, check to see if Jenkins is running. If it isn't start it.
sudo /etc/init.d/jenkins status
sudo /etc/init.d/jenkins start


Install some needed Jenkins plugins
Jenkins has lots of plugins that will allow it to do lots of interesting things. We will be needing a few of them. To install plugins, click on the Manage Jenkins link from the list of links on the left-hand side of the page. Next click on the Manage Plugins link from the resulting page. Finally click on the Available tab from the Plugin Manager page.
- Jenkins Cobertura Plugin
- Jenkins GIT plugin
- Jenkins Violations
After you've check the checkboxes, click the Download now and install after restart button at the bottom of the page.

Our first job
When Jenkins comes back, click the New Job link from the left-hand list of links. This will bring you to a page where you can enter a job name and select a job type. Enter Project1 for the job name and select Build a free-style software project, then click the OK button.
1 - Where to get the source
Under the Source Code Management section, click the Git radio button. This will expand more options. For this project we'll be keeping things simple. Simply enter the path to your git repository. Mine's at /home/steve/dev/project1 (this presumes your git repo is on the same box that Jenkins is running on).
2 - When to run the job
Next go to the Build Triggers section and check the Poll SCM checkbox. In the resulting Schedule field, enter 5 *'s. (* * * * *) This makes Jenkins check the git repository for changes once a minute, every minute of every day. If it finds a change in the repository, it will "do a build". We'll be configuring "the build" to run the unit tests and code coverage and quality tests for us.
BTW, for larger Jenkins implementations (more than 10 or so Jenkins jobs), the Poll SCM option is a terrible idea. I can show you another way using git hooks if there is interest. For now, though, let's just use the Poll SCM option since this is just an example project.
3 - What to run
Next, let's configure the job to do what we want it to when it detects a change in the git repository. In the Build section, click the Add build step button and select Execute shell from the resulting popup. In the resulting Command field, enter the following text:Let's review what's going on here. When the Jenkins job detects that a source code change has occurred in the git repository, it will clone a copy of the repository and then run the above script against the clone.
You'll notice that the nosetests command has become a little more complex. I've added a fair number of command-line arguments to it. This is to make sure that the code coverage runs over all the code, not just the code that's involved in the unit tests. It also ensures that nosetests write's it's output to a file that Jenkins can interpret.
When nosetests runs the code coverage, it generates a .coverage file. Jenkins can't read that. The third line of the script (python -m coverage xml...) converts the .coverage file to an xml format that Jenkins Cobertura plugin can read.
The last line (pylint...) runs pylint on the project and outputs it in a format that the Violations Jenkins plugin can read. I also have it disabling a couple warnings that I don't care to know about. (You can customize this all you want BTW).

4 - Interpret the results
Not only can Jenkins detect changes and run our tests. Given the correct plugins are installed (which we did at the beginning), it can interpret the results and display them in charts/trees/etc. For me this is the best part. All the other stuff, I could have done with some clever scripting and cron.First stop is coverage. In the Post-build Actions section click the Public Cobertura Coverage Report checkbox. Then in the Cobertura xml report pattern field, enter coverage.xml.

This tells Jenkins to read a file named coverage.xml that will contain testing code coverage information in it. The line listed below (from the build script in step 3) is what creates this file:
python -m coverage xml --include=project1*
Next, click the Publish JUnit test result report checkbox and enter nosetests.xml in the Test report XMLs field.

This instructs Jenkins to interpret the a file named nosetests.xml that the nose command from creates:
nosetests --with-xunit --all-modules --traverse-namespace --with-coverage --cover-package=project1 --cover-inclusive
Finally, check the Report Violations checkbox and enter **/pylint.out in the pylint field.

This instructs Jenkins to interpret the pylint.out file that is generated by the pylint command from the build script:
pylint -f parseable -d I0011,R0801 project1 | tee pylint.out
At this point, you're done configuring the job. Click the Save button. Now you're ready to give it a go!
Run the job
Click the Build Now link on the left-hand list of links. This will manually kick off a run of the job. If no errors. You should see a screen that looks like the one below. If not refresh your page.
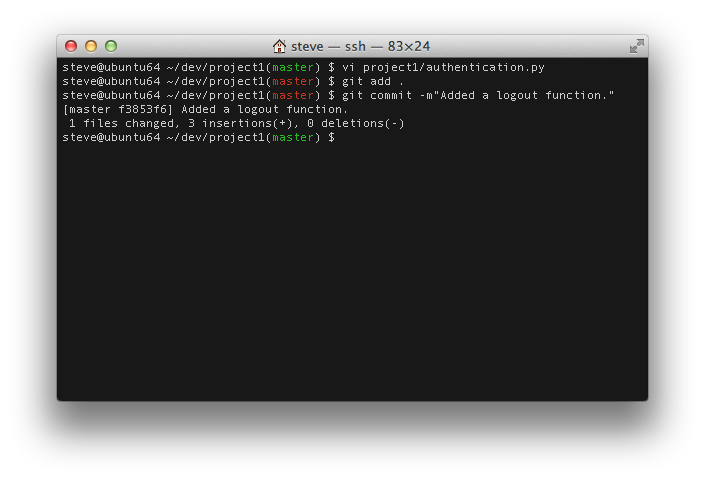
Update the code
Add the following code to your ~/dev/project1/project1/authentication.py file. Then save and commit it.def logout():
print 'You are now logged out.'

No go back to your Jenkins window and refresh the Project1 page. You may need to wait a minute. Remember, Jenkins only checks the git repository for changes once a minute. You should see some new info. The top graph is your code coverage. It indicates that you've dropped from 100% line coverage to 92%. This makes sense because we added function, but no test for it.
The second graph is your unit test pass/fail trend. It's all blue because all 3 of our tests are still passing. We'll break that next by adding a test for logout that fails. :-)
The third graph is your code quality report. It's indicating that we had 0 issues in the first build, but now have 1 issue in the second build.

You can get more info by clicking on the graphs. For example, let's drill into the code coverage graph.

You can browse even deeper. Click on the project1 link at the bottom.

Then click on the authentication.py link at the bottom.

As you can see by the red line at the bottom, the print statement at the bottom is never exercised by a unit test. Hmmmm. We'll need to fix that.
Add a failing test
Add this code to the ~/dev/project1/tests/authentication_tests.py file and then commit it to git:
def test_logout(self):
"""Test the logout function...badly."""
self.assertEqual(0, 1)

Wait a minute and then go back to the Jenkins Project1 page. It should now have a third build reporting the test failure.

That's it. Hope you found this helpful. Happy coding.
Subscribe to:
Posts (Atom)